The Motivation
I am definitely not a hardware guy. Never was and never will be, but nevertheless, I enjoy building my smart house and garden.
I started with not that smart weather station and moved its data to the cloud in my first blog and later used some open API of smart IoT products like Netatmo Cameras, see the article here.

Unfortunately, there are some limitations always. It is hard to customize the specialized products and mostly it is only possible to access the data from the cloud. So no way to get the data in case of internet connection or cloud server outage.
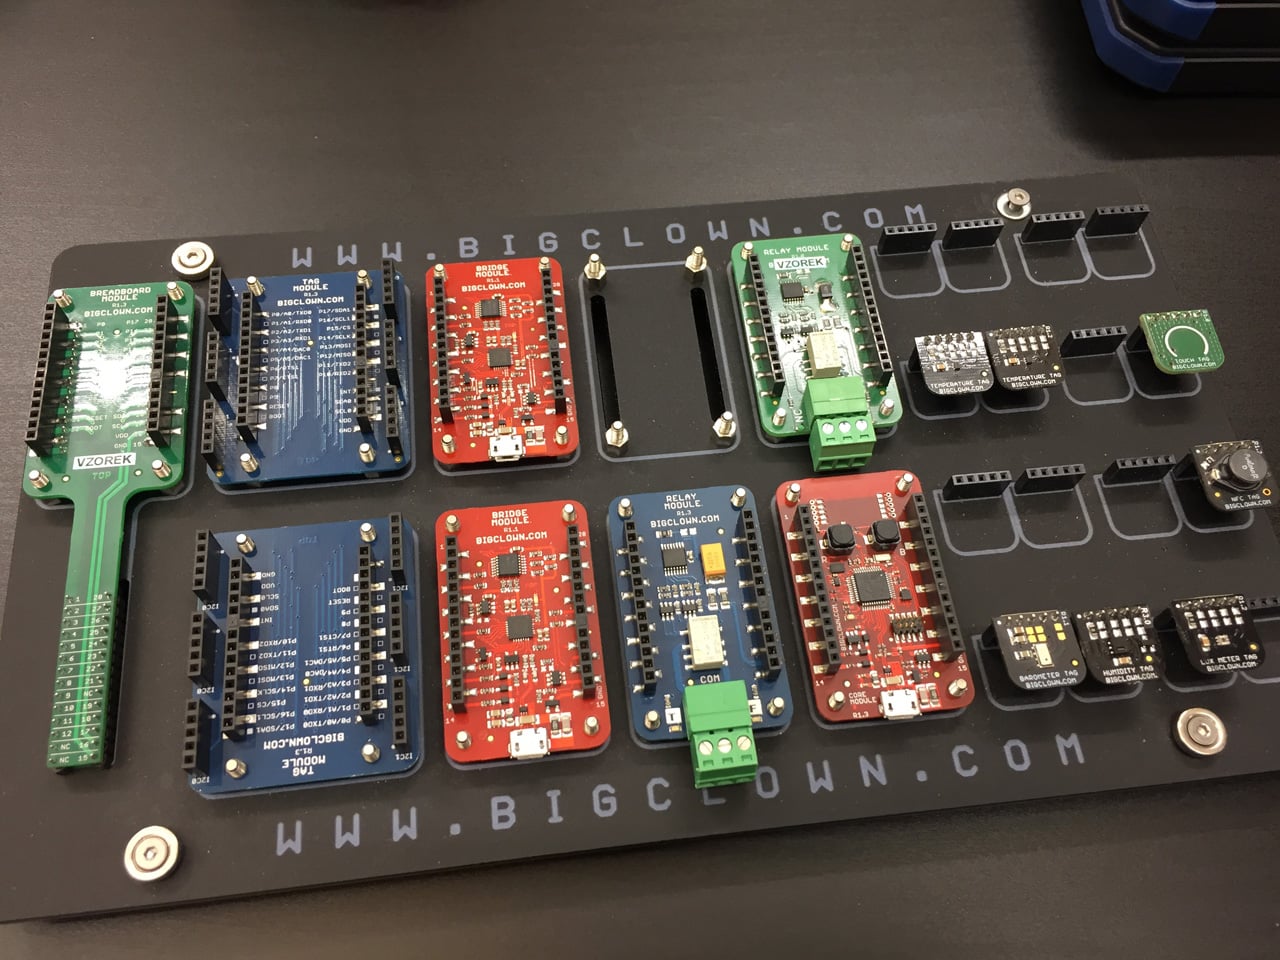
BigClown.com
Then I discovered the BigCLown modules. It looks like IoT LEGO. The same sort of precision and beautiful look. The similar options of building based on your own ideas. And quite logically, also the similar price.
But it is not just a nice toy as LEGO is, it is much more. It is ready for serious projects.
While the hardware part of the project is fixed as soon as you plug all required modules together, the software part is the real playground for me :)
The BigClown Playground
The standard setup for any software project is at least one development machine and the production server. Of course, for more professional setup some other environments are needed like testing, but let’s consider the simplest possible setup and you can always make it more complex later.
The Development Machine
The Firmware
I already mentioned that the hardware is not really my cup of tea, and I consider the low-level programming of hardware firmware to be part of that field as well. So my software development playground starts with loading the completed firmware into the hardware. This is the necessary minimum to make sure all the hardware compoments are in sync and everything is going to work as expected.
The Development Environment
Even though I’ve grown up on Windows I started to prefer Linux development machine. If you are really interested in automation, data or even data science and machine learning, everything is much easier and more natural from Linux environment. For some reason, perhaps the name :-) I ended up with one of the Ubuntu derivates, Lubuntu. It is fast and lightweight OS which can run even on older hardware.
Considering we have some kind of Ubuntu derivate, there are few things to install.
Python
The first set of tools is related to the most human-friendly programming language Python:
sudo apt update && sudo apt upgrade
sudo apt install python3 python3-pip python3-setuptools
sudo pip3 install --upgrade pip
With Python environment ready we can install BigClown Firmware Tool which will simplify the Firmware load for us:
sudo pip3 install --upgrade bcf
GIT
The essential part of any development environment is the version control system and I am positive GIT is the best one. Together with GitHub repository it helps you in infinite ways to improve the culture of your coding.
sudo apt-get install git-all
The impact is even bigger when using the public repository. I think it is the next step of human evolution which is already based on not just genes but also memes. You can consider sharing your code as the way to immortality :-) But of course, a better code has higher chances to succeed.
Sublime Text
It is easier to code in a good text editor. The selection is always a very personal choice. I feel most comfortable using Sublime Text.
wget -qO - https://download.sublimetext.com/sublimehq-pub.gpg | sudo apt-key add -
echo "deb https://download.sublimetext.com/ apt/stable/" | sudo tee /etc/apt/sources.list.d/sublime-text.list
sudo apt update && sudo apt install sublime-text
Remote access tools
Remote work is a natural part of Linux OS and I prefer using mosh to access other Linux machines. It makes the remote work usable even in case of imperfect connection. It is like ssh but with instant response and without interruptions so you have the feel of local work instead of the remote.
sudo apt-get install mosh
To access Windows machines remotely I use remmina.
sudo apt-get install remmina
Other tools
Simple image viewer/editor: nomacs
sudo add-apt-repository ppa:nomacs/stable
sudo apt-get update
sudo apt-get install nomacs
For MySQL and MariaDb management I use MySQL Workbench
sudo apt install mysql-workbench
Other specific tools for specific tasks are mentioned in particular articles, like web app development or writing the blog
The Production Server
In my very first article here I started to use a tablet as a server. Now I can modestly say it was a brilliant idea. The main benefit is definitely the ability to run several hours on battery in case of a power outage but there is more. You can anytime easily check the server status using its screen and you can even use the screen as some sort of dashboard terminal.
Together with BigCLown sensors running on batteries you get robust sensor network providing a continuous history of all your measurements.
You can buy very cheap tablets now, where the price is not that far from the price of Raspberry Pi, but you can also use some old tablet which is not used anymore and I am also considering the idea of using some old smartphone for that.
To keep things simple I use the same OS as for development machine, Lubuntu. Let’s look into the server installations now. It begins as on the development machine.
Python
sudo apt update && sudo apt upgrade
sudo apt install python3 python3-pip python3-setuptools
sudo pip3 install --upgrade pip
Node.Js
curl -sL  https://deb.nodesource.com/setup_8.x | sudo -E bash -
sudo apt-get install -y nodejs
Process Manager PM2
sudo npm install -g pm2
sudo -H PM2_HOME=/home/$(whoami)/.pm2 pm2 startup systemd -u $(whoami)
sudo -H chmod 644 /etc/systemd/system/pm2-$(whoami).service
Few PM2 commands to remeber
to list all pm2 processes
pm2 list
to get details about particular process
pm2 show PROCESS_NAME
to restart particular process, for example after config changes
pm2 restart PROCESS_NAME
Node-RED
sudo npm install -g --unsafe-perm node-red
pm2 start `which node-red` -- --verbose
pm2 save
BigClown Firmware Tool
sudo pip3 install --upgrade --no-cache-dir bcf
The Access layers
The more sensors you have in your network, the more important it is, to introduce some level of abstraction to unify the access to data from various sources.
Current
The first layer represents the flow of actual measurements coming from the sensors where only changed values are allowed to enter the flow. This layer is implemented by MQTT messaging protocol.
sudo apt install mosquitto mosquitto-clients
History
The second layer represents the time series history of value changes for each sensor. It is provided by time series database InfluxDb.
«ubuntu/ artful stable» below has to be replaced with the name of installed Linux distribution (jessie, xenial,…)
curl -sL https://repos.influxdata.com/influxdb.key | sudo apt-key add -
echo "deb https://repos.influxdata.com/ubuntu/ artful stable" | sudo tee /etc/apt/sources.list.d/influxdb.list
sudo apt update && sudo apt install influxdb
sudo systemctl start influxdb
Integration
The third layer combines data from various sources to put information into context. This is still the domain of relational SQL database like MySQL. Let’s skip this layer for now.
Machine learning
Forth layer is recognizing new or defined patterns processing selected dataset from whatever layer below. Python machine learning library scikit-learn can be used here. Let’s skip this layer for now.
Reporting, Alarms, Management
Any of the layers below can directly feed some reporting tool or an alarm. Here are unlimited options.
How to make it all work
Let’s start with the development machine where the bcf tool is already installed.
Update firmware in BigCLown modules
first make sure we have actual firmware ready
bcf update
Then list the available firmware
bcf list
Which looks like:
bigclownlabs/bcf-gateway-usb-dongle:v1.7.4
bigclownlabs/bcf-generic-node-battery-mini:v1.7.4
bigclownlabs/bcf-generic-node-battery-standard:v1.7.4
bigclownlabs/bcf-generic-node-power-module-rgb150:v1.7.4
bigclownlabs/bcf-generic-node-power-module-rgb300:v1.7.4
bigclownlabs/bcf-generic-node-power-module-rgbw144:v1.7.4
bigclownlabs/bcf-generic-node-power-module-rgbw72:v1.7.4
There are more of them but this is the list of my regular choices. First line is the firmware for the usb-dongle. The rest is firmware for the core module making it a remote generic node. Basically a generic node can be any kind of remote sensor you need, it adapts to the role you give it. The names of listed node variants are nicely descriptive. All variants support all available BigClown sensors. The battery nodes are just sending the sensor reading anytime the value changes. The power nodes not only sends information but also wait for the commands.
There is a distinct way how to load the usb-dongle firmware after you connect it to an USB port, but first let’s see how to identify the plugged dongle.
bcf devices
to get something like
/dev/ttyUSB0
Okay, now we use the device information to load the usb-dongle firmware:
bcf flash --device /dev/ttyUSB0 bigclownlabs/bcf-gateway-usb-dongle:latest
To load the firmwate to the core module, the core module has to be connected to an USB port, then press and keep holding the B button on the Core Module. Now press and release the R button and finally release also the B button. The core module is ready to the last step:
bcf flash --dfu bigclownlabs/bcf-generic-node-battery-mini:latest
Now let’s move to the Production server
Tools feeding the access layers
BigClown to MQTT
First tool catches the data coming from wireless modules and publish them using MQTT protocol. It works both ways so can also send commands to the modules.
sudo pip3 install --upgrade --no-cache-dir bcg
echo 'SUBSYSTEMS=="usb", ACTION=="add", KERNEL=="ttyUSB*", ATTRS{idVendor}=="0403", ATTRS{idProduct}=="6015", ATTRS{serial}=="bc-usb-dongle*", SYMLINK+="bcUD%n", TAG+="systemd", ENV{SYSTEMD_ALIAS}="/dev/bcUD%n"'  | sudo tee --append /etc/udev/rules.d/58-bigclown-usb-dongle.rules
sudo mkdir -p /etc/bigclown
sudo nano /etc/bigclown/bcg-ud.yml
then copy, paste and save following content
device: /dev/bcUD0
name: "usb-dongle"
mqtt:
    host: localhost
    port: 1883
and finally daemonize the tool using pm2 to make it running as a service
pm2 start /usr/bin/python3 --name "bcg-ud" -- /usr/local/bin/bcg -c /etc/bigclown/bcg-ud.yml
pm2 save
MQTT to INFLUXDB
Second tool can store the current data into time series database and keep the history for specified measurements.
sudo pip3 install --upgrade --no-cache-dir mqtt2influxdb
sudo nano /etc/bigclown/mqtt2influxdb.yml
then copy paste and save following content:
mqtt:
  host: 127.0.0.1
  port: 1883

influxdb:
  host: 127.0.0.1
  port: 8086
  database: node

points:
  - measurement: temperature
    topic: node/+/thermometer/+/temperature
    fields:
      value: $.payload
    tags:
      id: $.topic[1]
      channel: $.topic[3]

  - measurement: relative-humidity
    topic: node/+/hygrometer/0:4/relative-humidity
    fields:
      value: $.payload
    tags:
      id: $.topic[1]

  - measurement: illuminance
    topic: node/+/lux-meter/0:0/illuminance
    fields:
      value: $.payload
    tags:
      id: $.topic[1]

  - measurement: pressure
    topic: node/+/barometer/0:0/pressure
    fields:
      value: $.payload
    tags:
      id: $.topic[1]

  - measurement: co2
    topic: node/+/co2-meter/-/concentration
    fields:
      value: $.payload
    tags:
      id: $.topic[1]
and also daemonize the tool using pm2 to make it running as a service
pm2 start /usr/bin/python3 --name "mqtt2influxdb" -- /usr/local/bin/mqtt2influxdb -c /etc/bigclown/mqtt2influxdb.yml
pm2 save
Time to see it working
Let’s plug the USB dongle into the production server and open two terminal windows.
First one to show all MQTT messages published on the server:
mosquitto_sub -h SERVER_IP -v -t '#'
Second to send the commands. Start with requesting the gateway information to make sure the USB dongle was found:
mosquitto_pub -h SERVER_IP -t gateway/all/info/get -n
And you should see something like below in the first window:
gateway/usb-dongle/info {"id": "836d1983a739", "firmware": "bcf-gateway-usb-dongle", "version": "v1.7.4"}
Then put the USB dongle to the pairing mode:
mosquitto_pub -h SERVER_IP -t gateway/usb-dongle/pairing-mode/start -n
Now it is ready to be paired with wireless sensors. The core module with generic node Firmware gets to the pairing mode whenever it restarts, so unplug and plug the battery module, disconnect and connect the USB/power cable or press the restart button.
Then the paired node should be announced by a similar message in the first terminal:
node/836e1983a739/info {"firmware": "generic-node-power-module-rgbw144", "version": "v1.7.4"}
After pairing all the nodes, stop the pairing mode:
mosquitto_pub -h SERVER_IP -t gateway/usb-dongle/pairing-mode/stop -n
And you can list alls paired nodes using this command:
mosquitto_pub -h SERVER_IP -t gateway/usb-dongle/nodes/get -n
And some small customization
I prefer to customize the node names, to have names instead of numbers. And I don’t relate the node name to actual role or location but rather give each core module some long term unique name.
Then I can relate the actual location and role to the node name when needed.
To customize node names use MQTT:
mosquitto_pub -t 'gateway/usb-dongle/alias/set' -m '{"id": "836d19838e5e", "alias": "ulmus"}'
mosquitto_pub -t 'gateway/usb-dongle/alias/set' -m '{"id": "836d19822047", "alias": "fraxinus"}'
mosquitto_pub -t 'gateway/usb-dongle/alias/set' -m '{"id": "836d19822262", "alias": "salix"}'
mosquitto_pub -t 'gateway/usb-dongle/alias/set' -m '{"id": "836d19822e3b", "alias": "quercus"}'
mosquitto_pub -t 'gateway/usb-dongle/alias/set' -m '{"id": "836d19821824", "alias": "pinus"}'
mosquitto_pub -t 'gateway/usb-dongle/alias/set' -m '{"id": "836d19822b26", "alias": "carpinus"}'
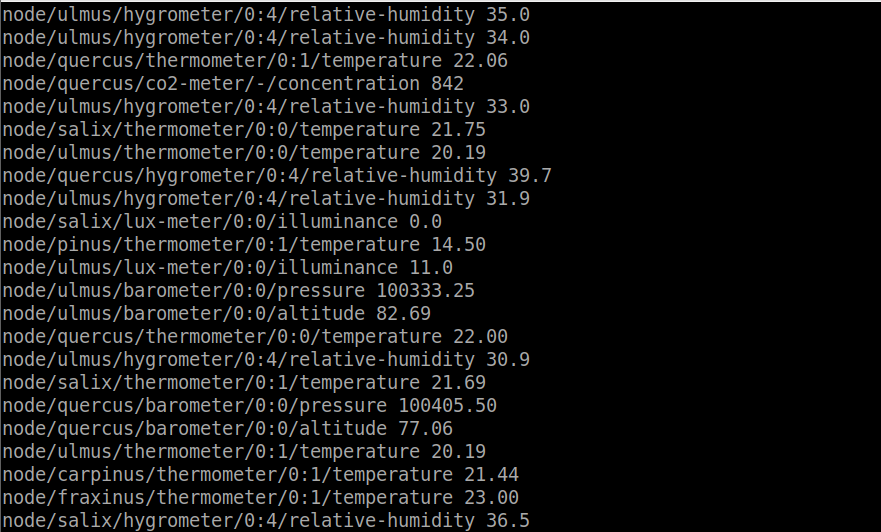
The Matrix: BigClown Sensor Network
And now we can enjoy The Matrix of measurements coming from all the nodes :)